Stop Wasting Ad Money: Meta Pixel + CAPI Setup for Next.js (Open Source)
What Is the Meta Pixel?
The Meta Pixel (formerly the Facebook Pixel) is a small piece of JavaScript that you add to your website. It tracks visitor actions - page views, button clicks, purchases, sign-ups - and sends that data back to Meta so you can measure how your Facebook and Instagram ads are performing.
It lets you do three things: measure ad conversions so you know which campaigns actually generate revenue, build custom audiences so you can retarget people who already visited your site, and feed Meta's algorithm the data it needs to optimize delivery and find more people like your best customers.
If you are running paid campaigns on Facebook or Instagram without the pixel installed, you are flying blind - spending money with no feedback loop.
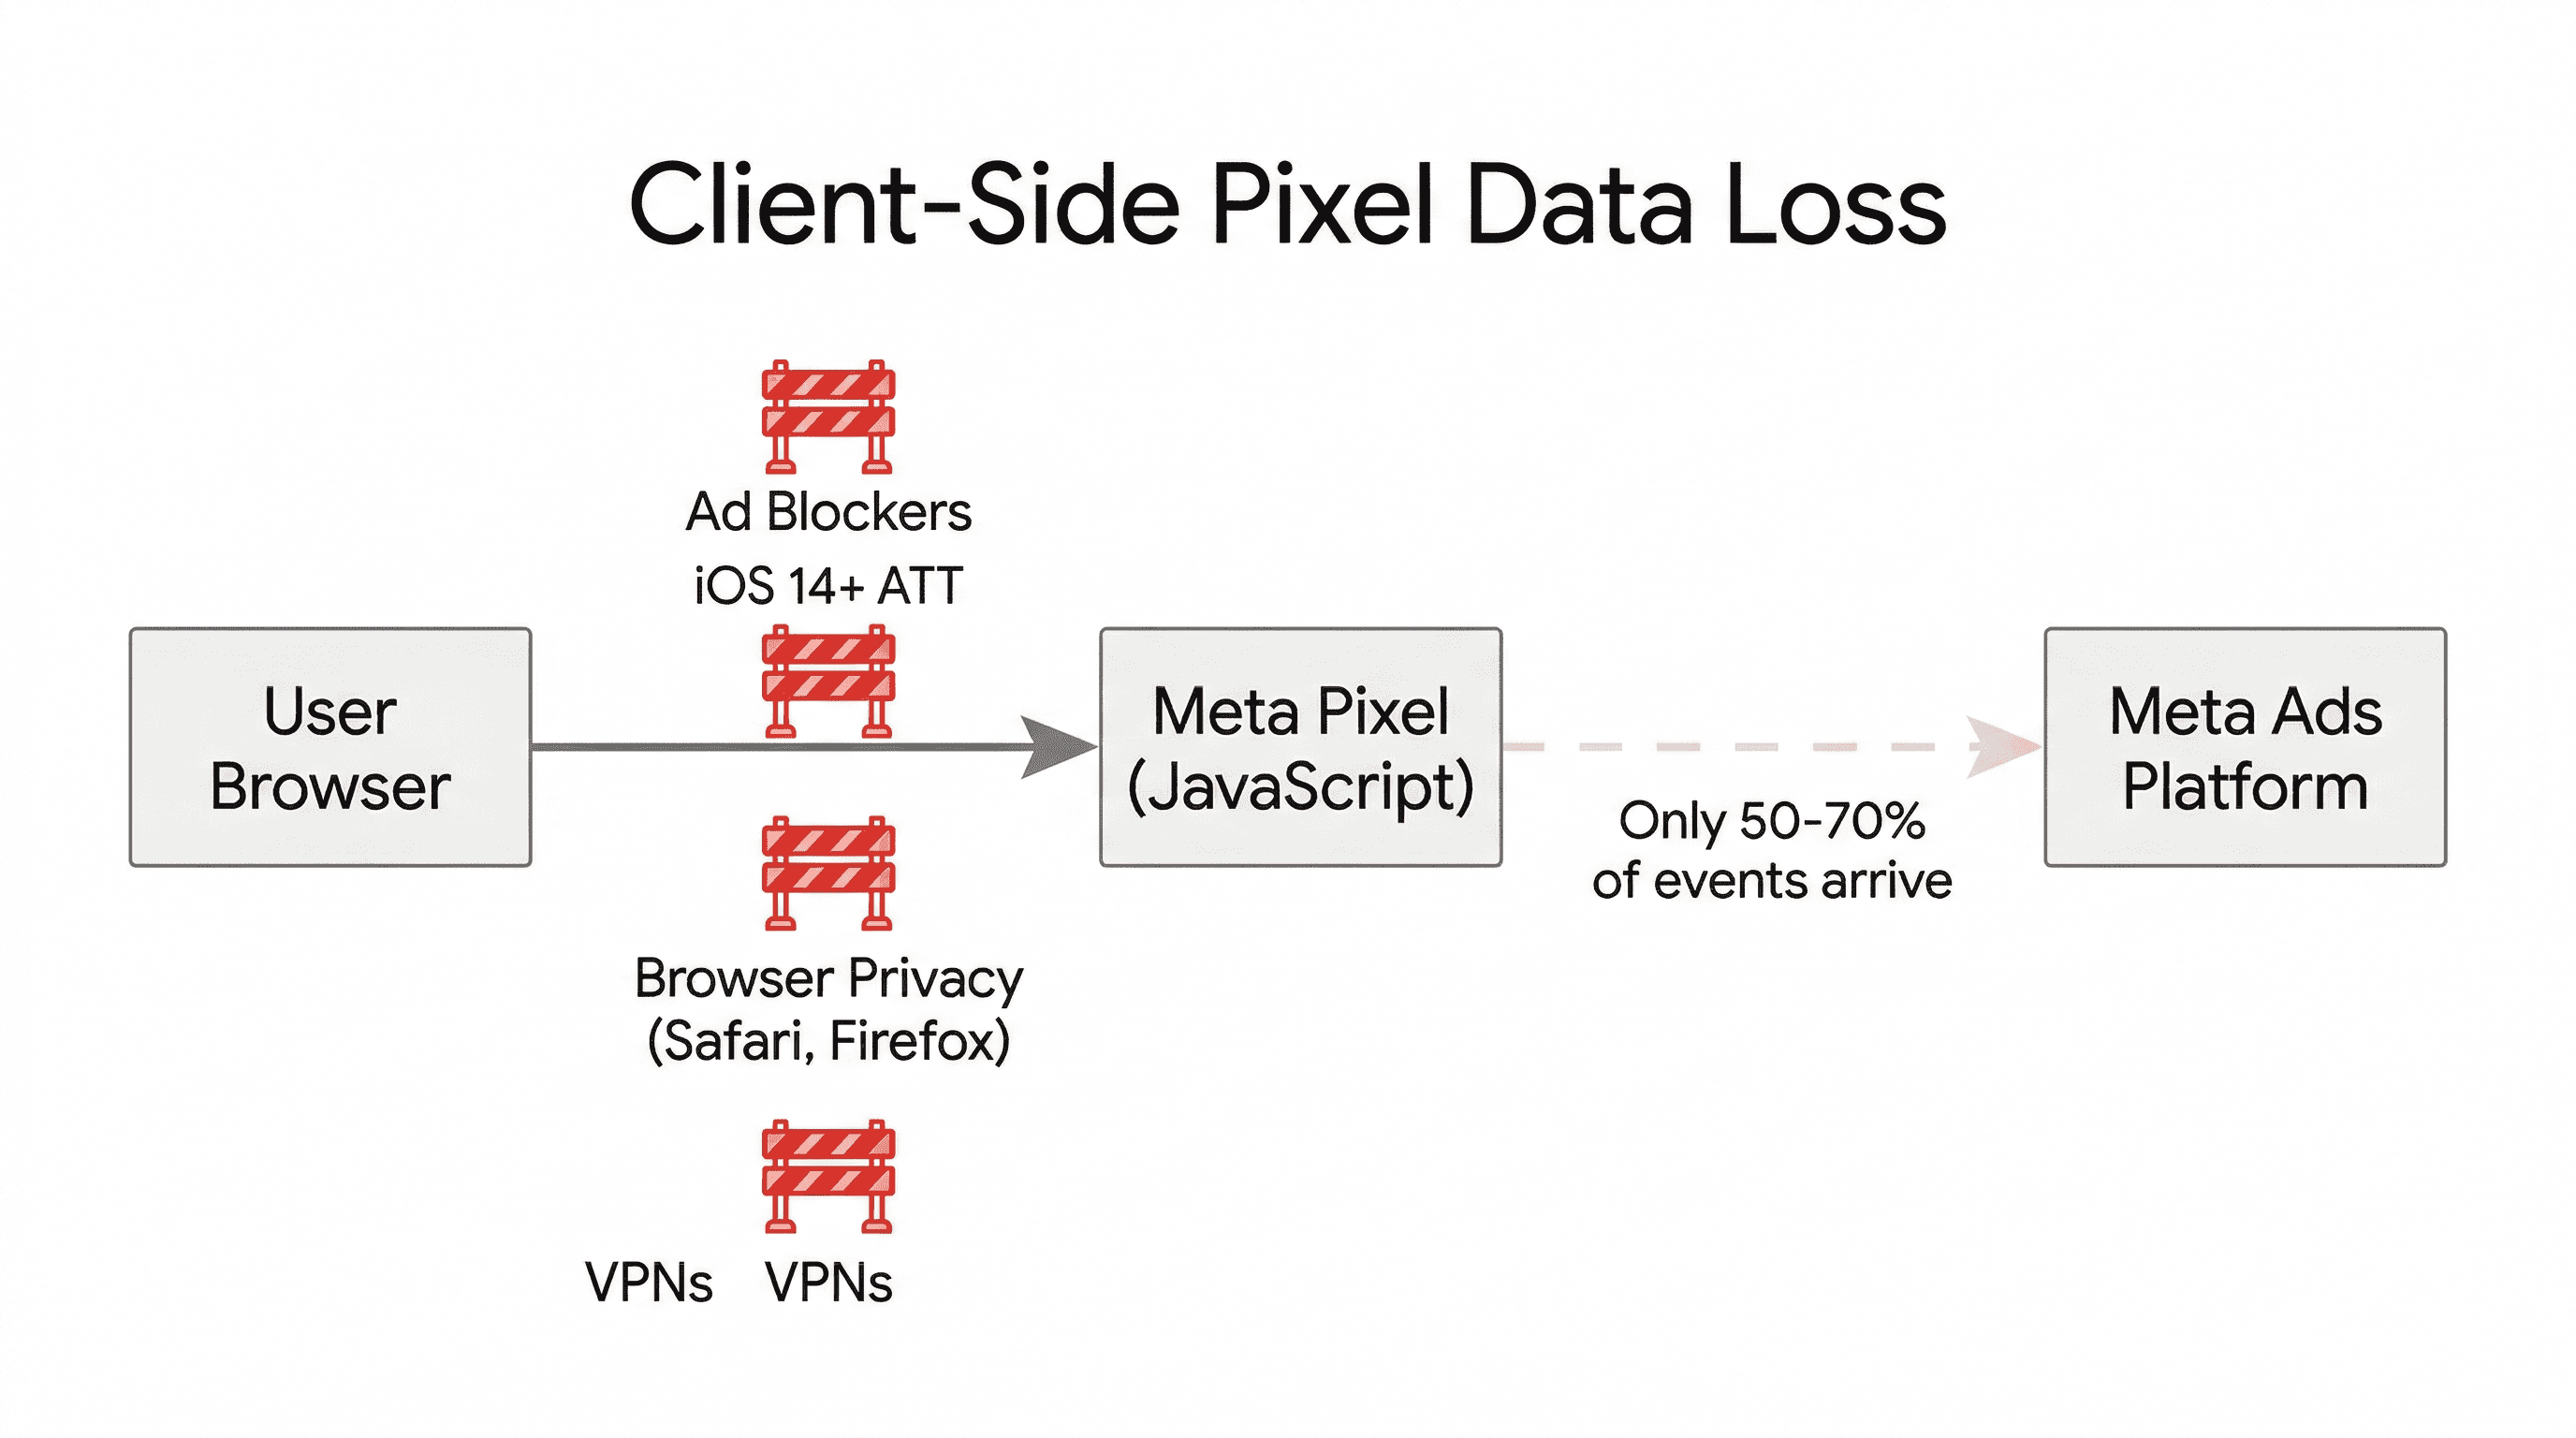
The Problem: Your Pixel Is Missing Half Your Data
Here is the thing most developers do not realize: even if you set up the Meta Pixel perfectly, you are probably losing 30-50% of your conversion data. The pixel is a client-side script. It runs in the browser. And browsers are increasingly hostile to tracking scripts:
- Ad blockers block the Meta Pixel JavaScript entirely - the script never loads, events never fire.
- iOS 14+ App Tracking Transparency - Safari's Intelligent Tracking Prevention and user opt-outs kill third-party cookies.
- Browser privacy restrictions - Firefox and Brave block trackers by default, and Safari aggressively limits cookie lifetimes.
- VPNs and privacy tools - increasingly common, especially among tech-savvy users.
The result: Meta's ad algorithm gets incomplete data. It cannot accurately tell which ads are driving conversions. It cannot optimize delivery properly. You end up paying more for worse results because the algorithm is working with a partial picture.
The Solution: Conversions API (CAPI)
This is where the Conversions API comes in. CAPI sends conversion events server-side - directly from your Next.js backend to Meta's servers. No browser involved. No JavaScript to block. No cookies to restrict.
The best setup uses both the Pixel and CAPI together. The Pixel handles what it can on the client side. CAPI sends the same events from the server. Meta deduplicates them using an event ID so nothing gets counted twice. The result is a much more complete picture of what is actually happening on your site.
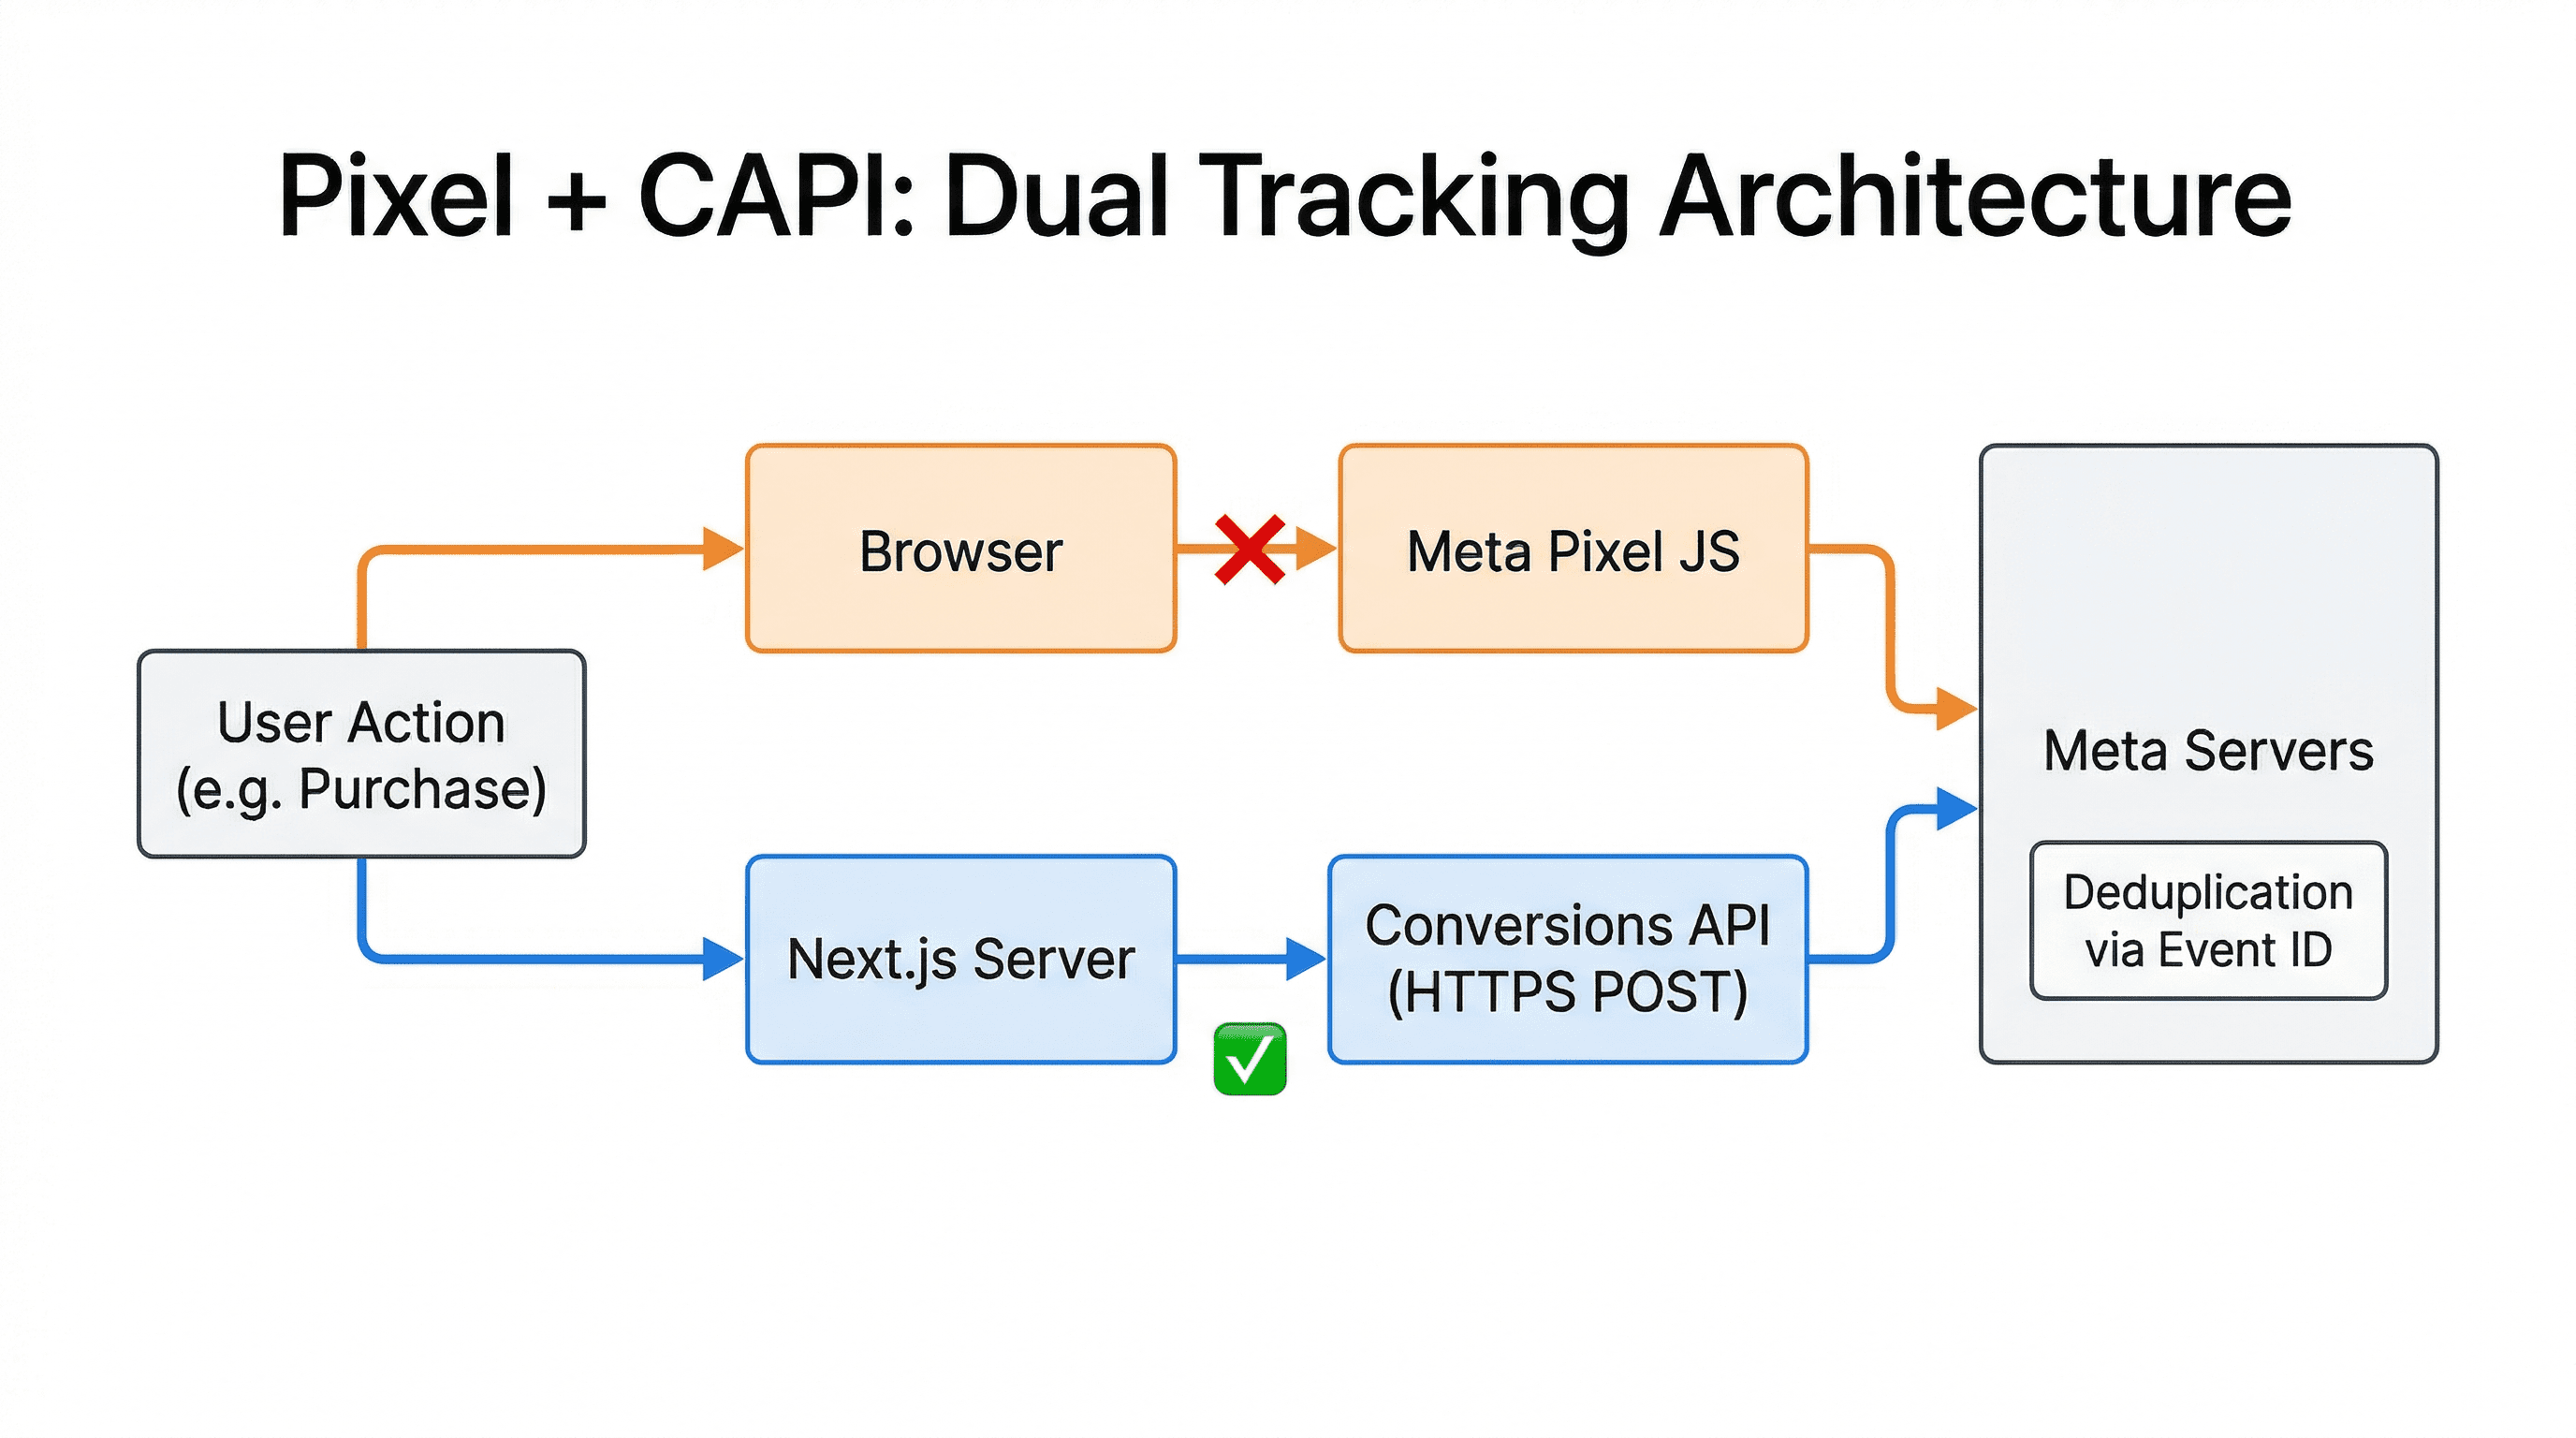
Pixel Only vs Pixel + CAPI
Pixel Only
- Blocked by ad blockers
- Killed by iOS privacy settings
- Loses 30-50% of events
- Algorithm optimizes on bad data
- Higher cost per acquisition
Pixel + CAPI
- Server-side events bypass blockers
- Works regardless of browser privacy
- Near-complete conversion data
- Algorithm optimizes accurately
- Lower cost per acquisition
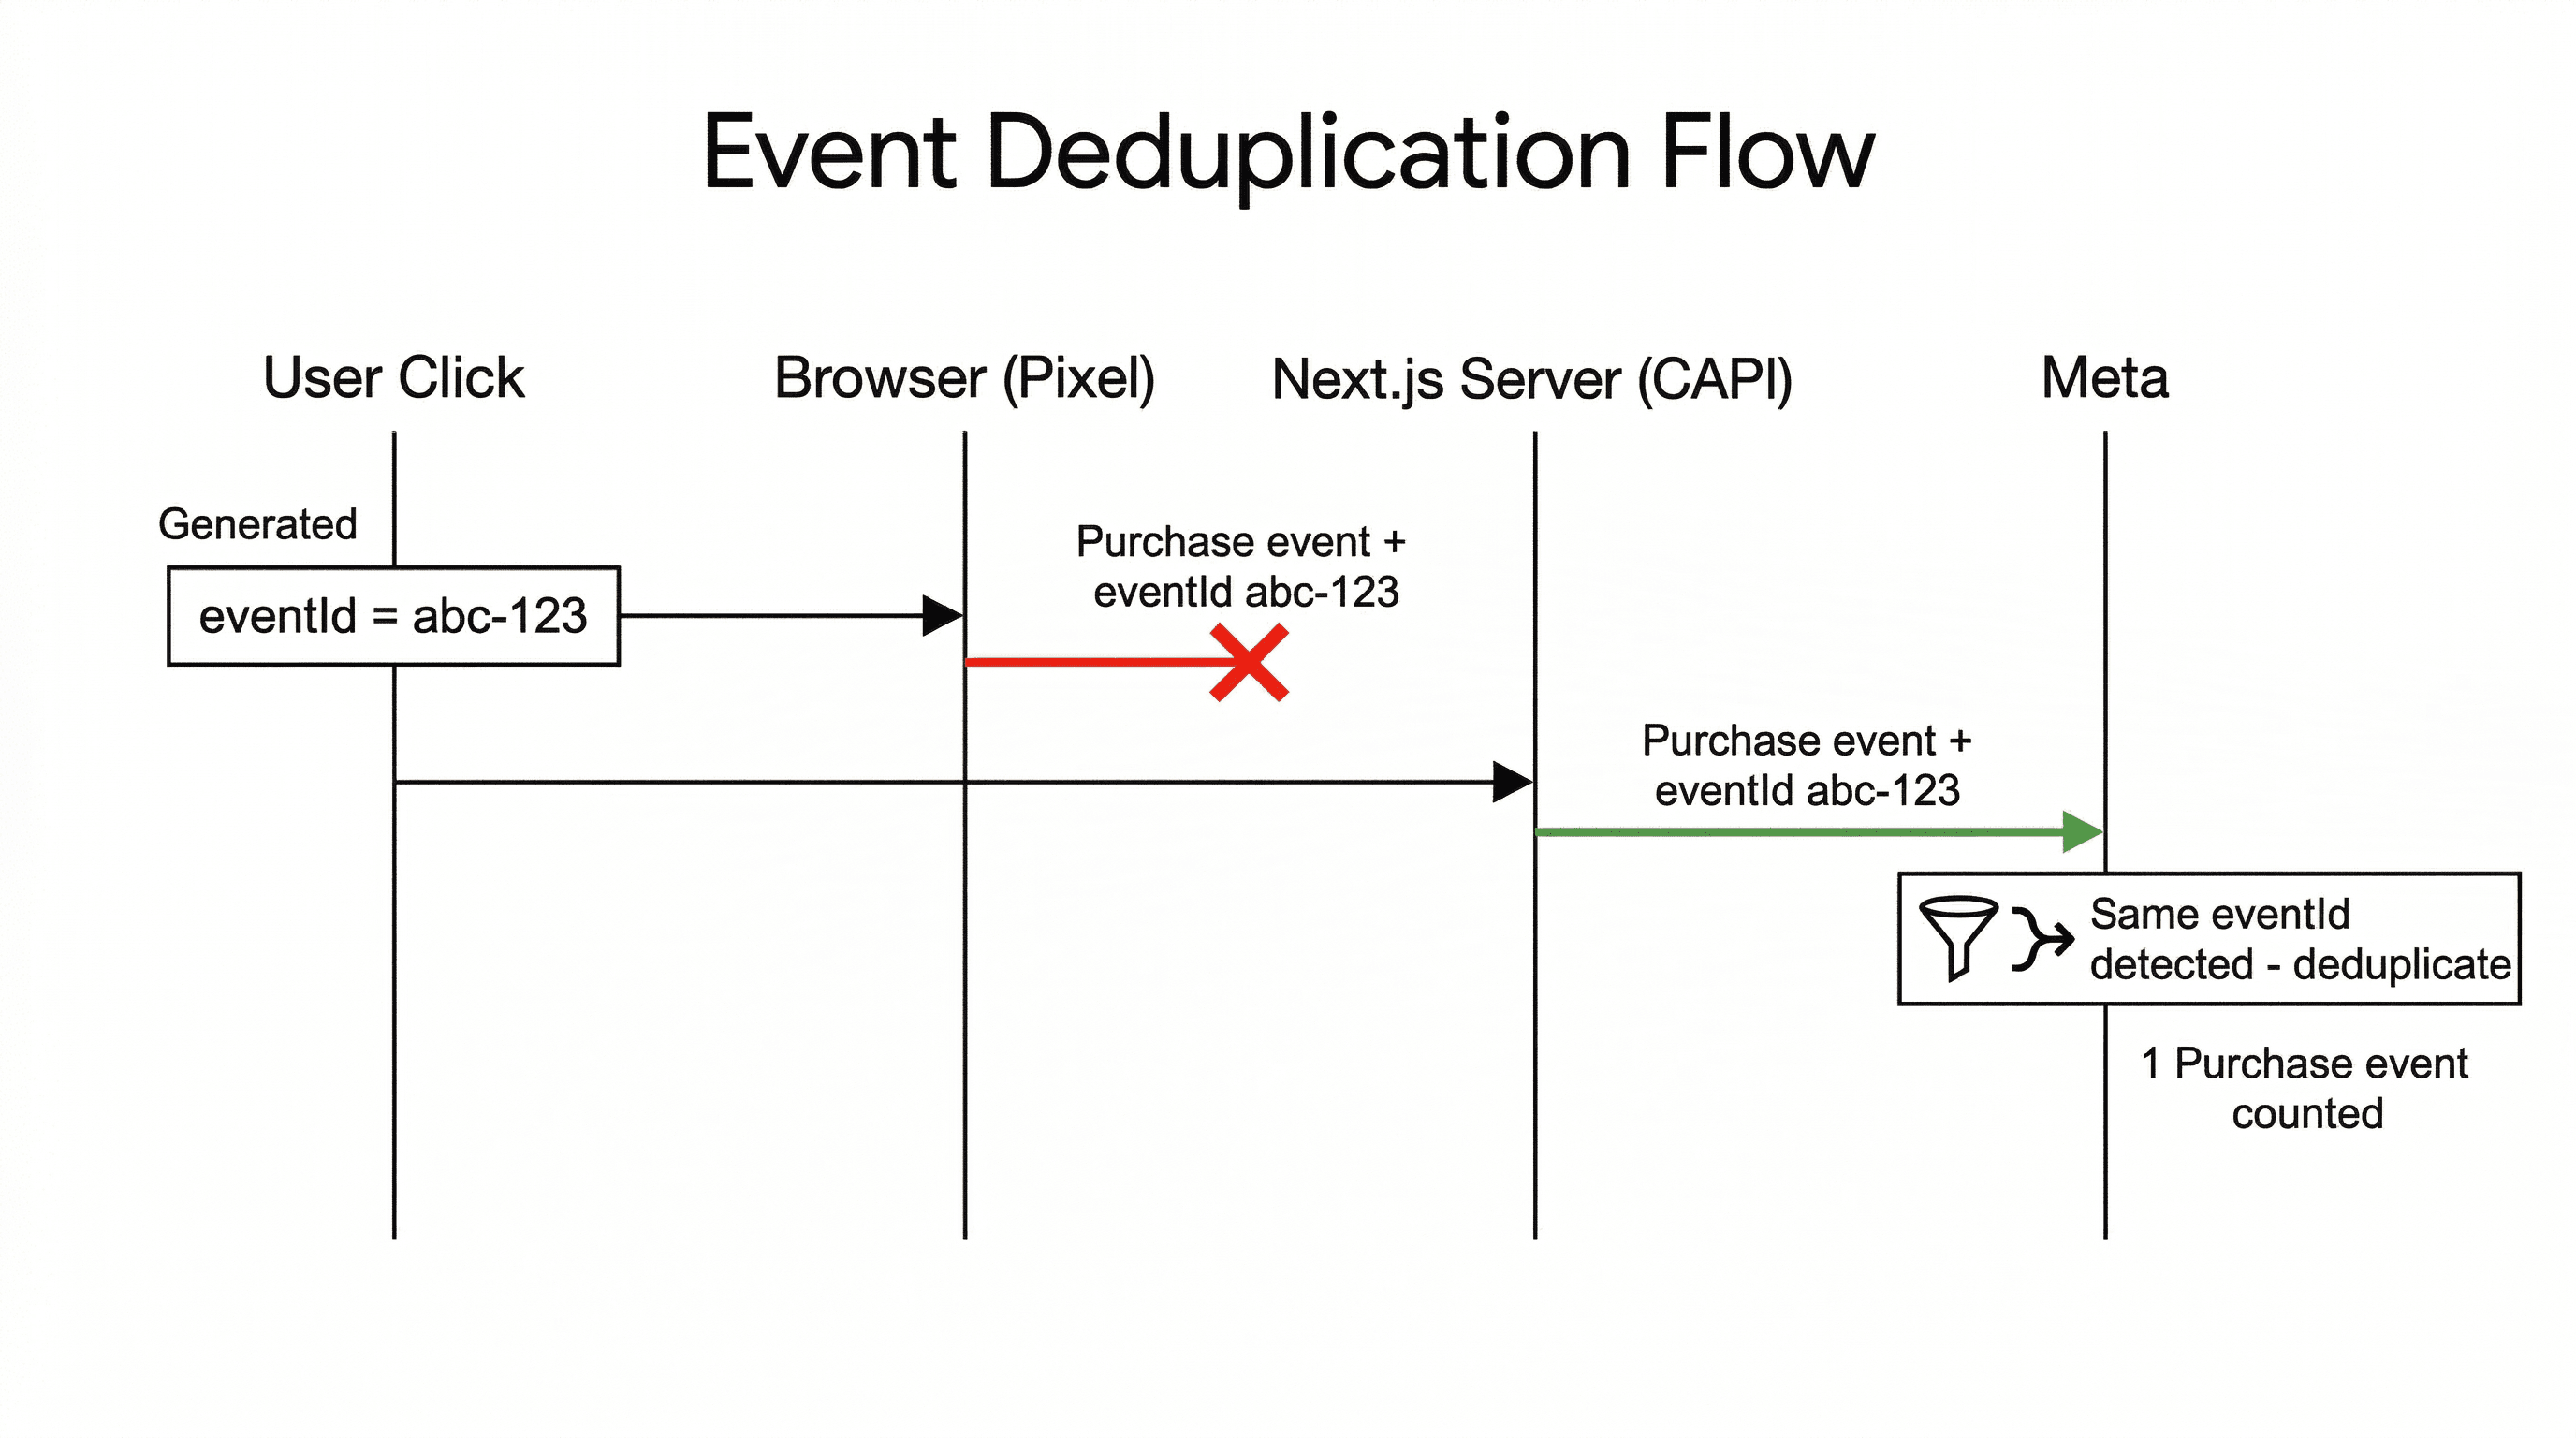
How CAPI Works
When a user completes an action on your site (a purchase, a form submission, a sign-up), your server sends an HTTP POST request directly to Meta's Conversions API endpoint with the event data. The request includes:
- Event name -
Purchase,Lead,PageView, etc. - Event time - when it happened (Unix timestamp).
- User data - hashed email, phone, IP address, user agent. Meta uses this to match the event to a user profile.
- Event ID - a unique ID shared with the client-side Pixel event so Meta can deduplicate.
- Custom data - value, currency, content IDs, or anything else relevant.
A server-side CAPI call looks like this:
// app/api/meta-capi/route.ts
import { NextRequest, NextResponse } from "next/server";
import crypto from "crypto";

const PIXEL_ID = process.env.META_PIXEL_ID!;
const ACCESS_TOKEN = process.env.META_CAPI_TOKEN!;

function hashSHA256(value: string): string {
  return crypto.createHash("sha256")
    .update(value.toLowerCase().trim())
    .digest("hex");
}

export async function POST(req: NextRequest) {
  const { eventName, eventId, email, value, currency } =
    await req.json();

  const response = await fetch(
    `https://graph.facebook.com/v19.0/${PIXEL_ID}/events`,
    {
      method: "POST",
      headers: { "Content-Type": "application/json" },
      body: JSON.stringify({
        data: [
          {
            event_name: eventName,
            event_time: Math.floor(Date.now() / 1000),
            event_id: eventId, // same ID as client-side
            action_source: "website",
            user_data: {
              em: email ? [hashSHA256(email)] : undefined,
              client_ip_address:
                req.headers.get("x-forwarded-for"),
              client_user_agent:
                req.headers.get("user-agent"),
            },
            custom_data: {
              value,
              currency: currency || "USD",
            },
          },
        ],
        access_token: ACCESS_TOKEN,
      }),
    }
  );

  const result = await response.json();
  return NextResponse.json(result);
}
The key detail is event_id. You generate a unique ID for each event, pass it to both the client-side Pixel and the server-side CAPI call. Meta sees both events with the same ID and knows they are the same action - it keeps one, discards the duplicate. If the client-side event got blocked, Meta still has the server-side one.
The Next.js Challenge
Next.js adds its own layer of complexity on the client side. It is a single-page application - when a user navigates between pages, the browser does not do a full reload. React swaps out the content client-side. That means the base pixel code only fires PageView once, on the initial load. Every subsequent navigation is invisible to the pixel.
This creates a few specific problems:
- Route changes are silent. You need to manually call
fbq("track", "PageView")on every client-side navigation. - Server components vs client components. The pixel needs access to
windowanddocument- you cannot drop it into a server component. - Script loading strategy. You need the pixel script to load correctly without blocking rendering or conflicting with Next.js' built-in script optimization.
- CAPI coordination. Client-side events and server-side events need to share the same event ID for deduplication to work.
You could wire all of this up yourself. Or you can use the package I built to handle it.
The Package: next-meta-pixel
I created next-meta-pixel - an open-source Next.js package that handles the client-side Meta Pixel integration. It gives you automatic page view tracking on route changes, full TypeScript support, a simple provider-based API, and easy event firing for both standard and custom events.
Installation
npm install next-meta-pixelAdding the Provider
In your root layout, add the MetaPixelProvider:
// app/layout.tsx
import { MetaPixelProvider } from "next-meta-pixel";

export default function RootLayout({
  children,
}: {
  children: React.ReactNode;
}) {
  return (
    <html lang="en">
      <body>
        <MetaPixelProvider pixelId="YOUR_PIXEL_ID">
          {children}
        </MetaPixelProvider>
      </body>
    </html>
  );
}
That handles the base setup - script injection, initialization, automatic PageView on first load, and route change tracking.
Firing Events with CAPI Deduplication
Here is where the Pixel + CAPI story comes together. When you track a conversion, you generate a shared event ID, fire the client-side event, and send the same event server-side:
"use client";

import { useMetaPixel } from "next-meta-pixel";
import { v4 as uuidv4 } from "uuid";

export default function CheckoutButton() {
  const { trackEvent } = useMetaPixel();

  const handlePurchase = async () => {
    const eventId = uuidv4();

    // 1. Fire client-side Pixel event
    trackEvent("Purchase", {
      value: 29.99,
      currency: "USD",
      eventID: eventId, // Meta uses this for dedup
    });

    // 2. Fire server-side CAPI event
    await fetch("/api/meta-capi", {
      method: "POST",
      headers: { "Content-Type": "application/json" },
      body: JSON.stringify({
        eventName: "Purchase",
        eventId,
        value: 29.99,
        currency: "USD",
        email: user.email, // if available
      }),
    });
  };

  return (
    <button onClick={handlePurchase}>
      Buy Now
    </button>
  );
}
Both events hit Meta with the same eventId. If the browser blocks the Pixel, Meta still gets the server-side event. If both go through, Meta deduplicates and counts it once. Either way, your conversion data is complete.
Tracking Other Events
The same pattern works for any event. Here are some common ones:
// Lead event (contact form, newsletter signup)
trackEvent("Lead", {
  content_name: "Contact Form",
  content_category: "inquiry",
});

// Add to cart
trackEvent("AddToCart", {
  content_name: "Premium Plan",
  content_type: "product",
  value: 29.99,
  currency: "USD",
});

// Custom events
trackEvent("WatchedDemoVideo", {
  video_title: "Product Overview",
  duration: 120,
});
Standard Events vs Custom Events
Meta recognizes a set of standard events that unlock special features in Ads Manager. When you use these, Meta knows exactly what they mean and can optimize for them:
PageView- handled automatically by the providerPurchase- user completes a purchaseLead- user submits a form or signs upAddToCart- user adds an item to their cartInitiateCheckout- user starts checkoutCompleteRegistration- user finishes registrationViewContent- user views specific contentSearch- user performs a searchAddPaymentInfo- user adds payment info
Use standard events whenever they match what you are tracking. They let Meta optimize your ad delivery - for example, optimizing for Purchase events tells Meta to show your ads to people most likely to buy. Custom events are for everything that does not fit a standard category.
Testing Your Setup
You need to verify both sides - the Pixel and CAPI.
Client-Side (Pixel)
Install the Meta Pixel Helper Chrome extension. Navigate through your site and watch it report which events fire. Make sure PageView fires on every route change - that is the most common thing people miss in SPAs.
Server-Side (CAPI)
Go to Meta Events Manager and open the Test Events tab. It shows events as they arrive in real time. Trigger a conversion on your site and confirm you see two events come in - one from the Pixel (browser), one from the server - with the same event ID. Meta should show them as deduplicated.
Also check the Overview tab for your event match quality score. The more user data you hash and send via CAPI (email, phone, name), the better Meta can match events to user profiles.
Privacy and Consent
Under GDPR, both the Pixel and CAPI require user consent before tracking. The Pixel is the easier one - do not render the MetaPixelProvider until the user accepts:
"use client";

import { MetaPixelProvider } from "next-meta-pixel";
import { useState } from "react";

export default function Providers({
  children,
}: {
  children: React.ReactNode;
}) {
  const [consent, setConsent] = useState(false);

  return (
    <>
      {consent ? (
        <MetaPixelProvider pixelId="YOUR_PIXEL_ID">
          {children}
        </MetaPixelProvider>
      ) : (
        <>
          {children}
          <CookieBanner onAccept={() => setConsent(true)} />
        </>
      )}
    </>
  );
}
For CAPI, the same rule applies - only send server-side events for users who have consented. Store the consent state in a cookie or your database, and check it before making CAPI calls.
Wrapping Up
The Meta Pixel alone is no longer enough. With ad blockers, iOS privacy changes, and browser restrictions, you are losing a significant chunk of your conversion data if you rely only on client-side tracking. CAPI fills that gap by sending events directly from your server to Meta.
The setup is straightforward: next-meta-pixel handles the client side (route tracking, script injection, TypeScript types), and a single API route handles the server side (CAPI calls with hashed user data). Share an event ID between both, and Meta deduplicates automatically.
If you are spending money on Meta ads and not using CAPI, you are leaving performance on the table. Set it up, verify it in Events Manager, and let Meta's algorithm work with complete data.
Star the repo on GitHub if you find it useful - and PRs are always welcome.
More blog posts